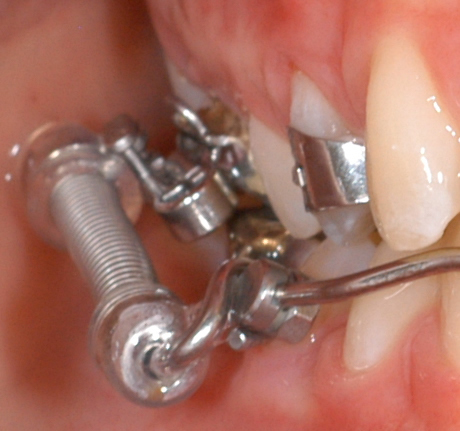
About the Xbow® (Crossbow®) Class II Corrector
Introduction
The Higgins Xbow® (Crossbow®) Class II Corrector, the CAAPP low-force system of braces, and the Higgins Indirect Bonding technique all add up to less time in braces, usually 12 to 18 months.
Xbow Two Phase Class II Treatment
- Half the battle is getting the brackets in the right place and using an efficient system of mechanics in phase two.
- The other half is what you do while you wait for the second molars to erupt, or...
- What you do between the time the maxillary first bicuspids and the second molars erupt.
Xbow® (Crossbow®) Blended Two Phase Treatment
The Xbow® system focuses on hitting phase one targets so there is less to do in phase two. The critical components of Xbow® phase one are:
- Beginning after the maxillary first bicuspids erupt to make space for the erupting canines.
- The RME is essential as practically all Class II’s require maxillary expansion.
- The Triple “L” Arch allows the use of Class II springs with the RME to correct overjet and open space for maxillary canines in phase one.
- The Class II spring side effects, such as a posterior openbite, settle between phases instead of the need for elastics to counter the side effects late in single-phase treatment.
The Xbow phase, including compensatory maxillary expansion, takes approximately one year. The second phase in full braces also takes approximately one year. The end result is that the lower incisors are proclined 4.6 degrees on average, which is similar to untreated, naturally compensated Class I occlusions with Class II skeletal patterns.
Xbow opens space for upper anterior alignment by bicuspid and molar distalization and transeptal fiber tension, and reduces overjet by passive retraction, without a continuous archwire to the upper incisors. The goal is to maintain or enhance upper lip fullness.
Over-correction and rebound are important when using Class II springs because the movement is rapid and the teeth are mobile and relapse quickly. Lower incisor proclination is an unstable movement. It makes sense to perform over-correction and allow rebound of lower incisor proclination in phase one instead of late in phase two.
If the plan includes an RME and lower lingual arch anyway, why not add Class II springs instead of waiting for the permanent dentition, a full edgewise appliance, and rectangular wires? Crossbow is something to do while your Class II patient is growing and you are waiting for second molars
June 2019: I have switched from Gurin Locks to the large size Rocky Mountain Lock. It is easier to install and doesn’t seem to slip between appointments like the Gurin Lock sometimes does. It can be rotated over 180 degrees to catch inside the pushrod loop and keep the pushrod away from the gingiva, just like the Gurin Lock.

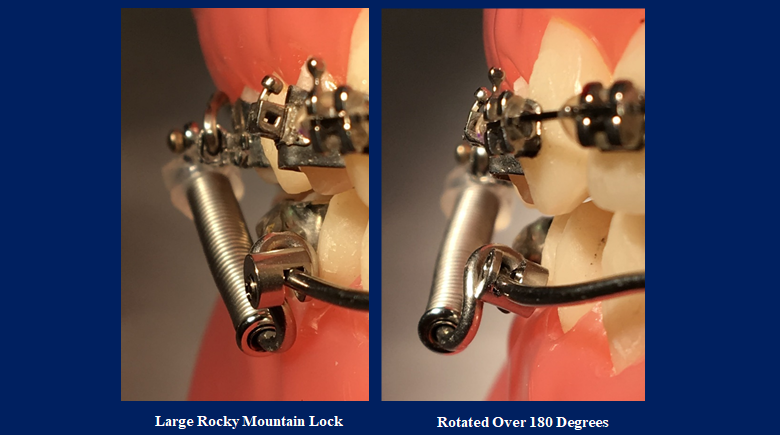
Xbow 2017: We have switched from headgear tubes to .036 x .072 sheaths. The “L” pins are made from .036 ball clasps with annealed ends. My favorite pushrod is still a 25 mm with a bayonet end.

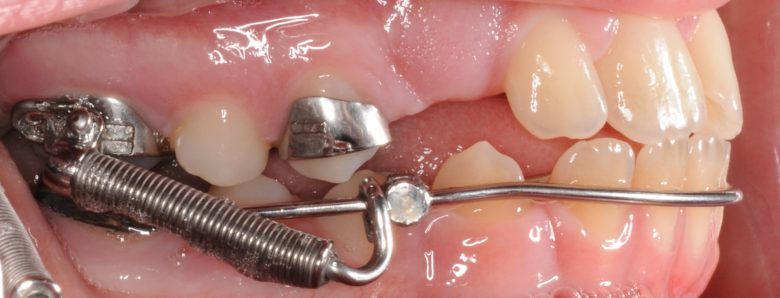
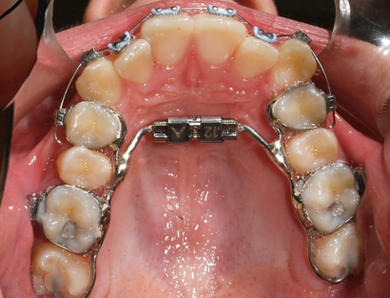
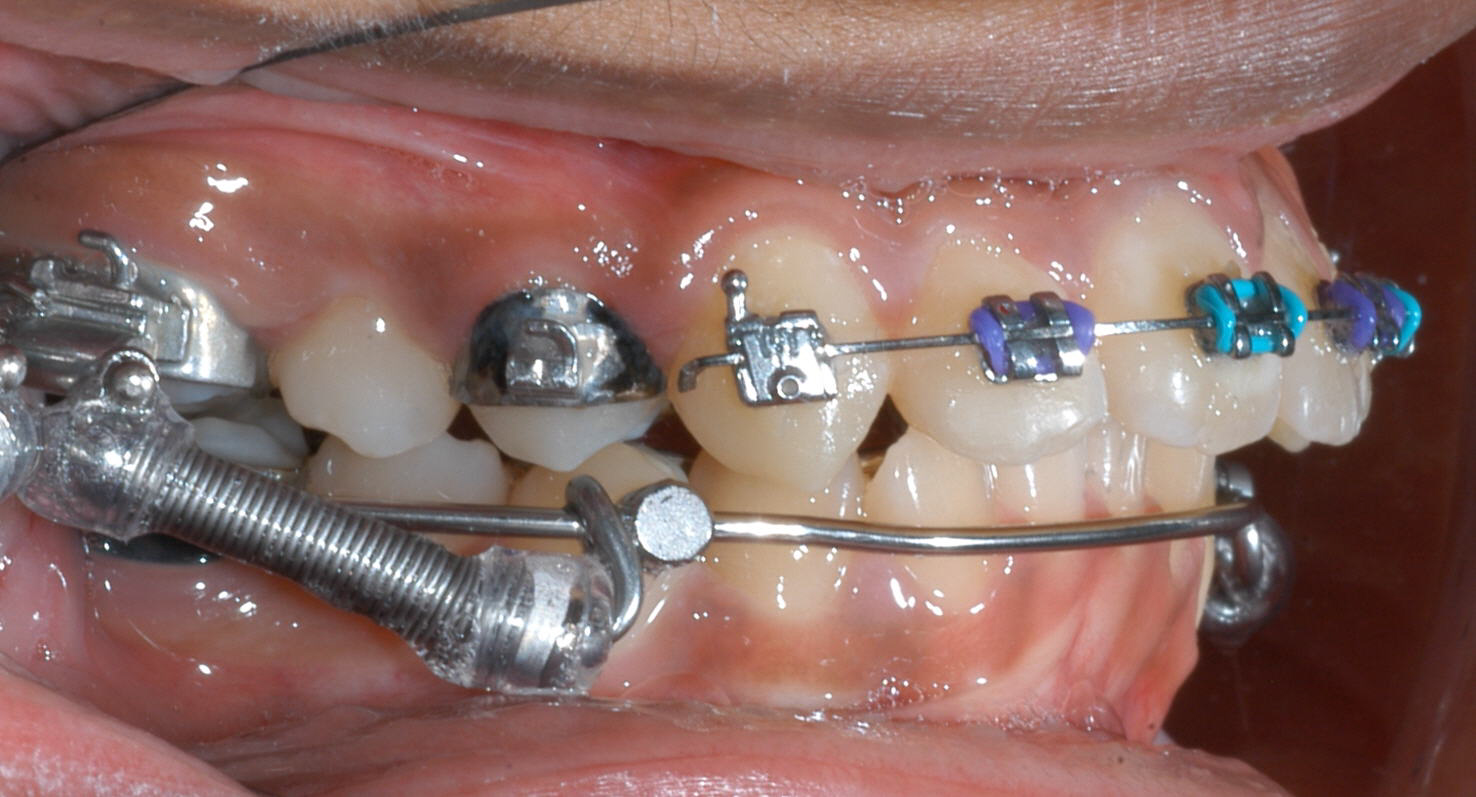
Mesial or “Shorty” Hook-Up with .036 x .072 sheath and 22 mm pushrod with bayonet bend. There is less “flipping” of the spring with mesial hook-ups with the sheath compared to the headgear tube. This is the main reason we switched to the sheath.
RME X 6: “Maxillary Transverse/Anterio-Posterior Expansion Appliance (Max TAP)”
The Xbow System is based on treating to an ideal maxillary arch form and width. Combining anterior alignment with Rapid Maxillary Expansion is more effective than archwire expansion by itself.
Xbow (Crossbow) Class II Corrector
Distalizing the upper bicuspids and molars opens space for the canines and corrects overjet by sharing the correction between the upper and lower. This maintains the upper incisor position and upper lip fullness as much as possible. The upper incisors are retracted passively by transeptal fibre tension to decrease root resorption.
Testimonial from Dr. Herb Hughes
“Our Orthodontic Study Club flew Dr. Higgins across North America to address our membership and to learn about his appliance and treatment philosophy. My patients and I couldn’t be more pleased with the results from Dr. Higgins’ Crossbow appliance! It has shortened their length of treatment time as well as delivers a superior final result. Dr. Higgins is a pioneer in the orthodontic field and very well respected amongst his orthodontic peers. Thanks for caring enough to share your ideas with our orthodontic community!”
Dr. Herb Hughes, President – Northern Virginia Orthodontic Study Club
Recommended Orthodontic Labs
Cottonwood Labs
6526 South State St. Suite #301
Murray, Utah 84107
(801) 904-2006
Specialty Appliances, Inc.
4905 Hammond Industrial Drive, Suite J
Cumming, Georgia 30041
(800)522-4636
Integral Dental Lab
#1402-805 West Broadway
Vancouver, British Columbia, V5Z 1K1
(604) 872-6656
Great Lakes Dental Technologies
200 Cooper Avenue
Tonawanda, NY 14150
(800) 828-7626
Published Xbow Articles
"Short-term skeletal and dental effects of the Xbow appliance as measured on lateral cephalograms"
As seen in the December 2009 American Journal of Orthodontics and Dentofacial Orthopedics.
"Lower incisor inclination changes during Xbow treatment according to vertical facial type"
As seen in the November 2010 Angle Orthodontist.
"Prediction of Lower Incisor Proclination During Xbow Treatment Based on Initial Cephalometric Variables"
As seen in the October 2011 Angle Orthodontist.
“Drs. Flores-Mir, McGrath, Heo, & Major's ‘Efficiency of Molar Distalization with the Xbow Appliance Related to Second Molar Eruption Stage’”
As seen in the November 2012 European Journal of Orthodontics.
“Incisor Inclination Changes Produced by Two Compliance-Free Class II Correction Protocols for the Treatment of Mild to Moderate Class II Malocclusions”
As seen in the May 2013 Angle Orthodontist
“Upper Airway Changes after Xbow Appliance Therapy Evaluated with CBCT”
As seen in the July 2014 Angle Orthodontist
“External Apical Root Resorption Generated by Forsus Simultaneously with Brackets vs. Xbow Followed by Brackets to Correct Class II Malocclusions”
As seen in the September 2015 Journal of the World Federation of Orthodontists
“Dental & Skeletal Changes in Mild to Moderate Class II Malocclusions Treated by Either a Twin-Block or Xbow Appliance Followed by Full Fixed Orthodontic Treatment”
As seen in the November 2015 Angle Orthodontist
Dr. Bob Miller also compared 8 two-phase Herbst cases with 7 two-phase Xbow cases and 7 single-phase Forsus cases.
Avg # of Visits
Herbst (two-phase) 29
Xbow (two-phase) 19
Forsus on arch wire (single phase) 26
Avg Chair Time (min/visit)
Herbst (two-phase) 32
Xbow (two-phase) 26
Forsus on arch wire (single phase) 32
Avg Time in Office (min)
Herbst (two-phase) 868
Xbow (two-phase) 556
Forsus on arch wire (single phase) 818
Clinical Use of the Xbow Appliance
The stages of treatment are:
- Maxillary expansion if a posterior crossbite exists or if there is maxillary constriction.
- Maxillary incisor alignment, if necessary.
- Distalization and over-correction of the maxillary bicuspids and molars to open space for maxillary canines,
- Compensatory maxillary expansion, if necessary,
- Expansion retention and replacement of springs on one or both sides, if necessary, and
- Phase 2 Alignment, overbite correction, space closure, and arch coordination using a full edgewise appliance.
The Xbow is made up of a maxillary expansion appliance, the Triple "L" Arch®, the 3M Unitek Forsus Fatigue Resistant Device with "L" pins, 22 mm Direct Push Rods, and Gurin locks (3M Unitek large size Order #560-400) or Large Rocky Mountain Locks (preferred).
Don't forget to order a Gurin lock or Rocky Mountain lock wrench.
Ask for the Dentaurum "Variety" two-leg expansion screw. There is less chance of palatal impingement with distal tipping and intrusion of the first molars than with a four-leg screw design. If the patient has a posterior crossbite or a narrow maxilla, expand the maxilla first. It makes it easier for a patient with a narrow maxilla to attach the Forsus device if you expand the maxilla first. If more than 12 mm of expansion is necessary use a SuperScrew.
Band the upper 6’s and the upper 4’s. Control of the upper first bicuspids is important if the goal is overcorrection and the bite-catching effect of the first bicuspids. Fit the bands and take an alginate impression. Place the bands in the impression and secure them with sticky wax.
Pour the impression and check the band position before sending the case to the lab.
Dr. Bob Miller places compound material over the bands before taking the alginate impression. This method ensures that the band placement in the impression is correct.
Another method is to place separators for a week, remove the separators, take impressions, and replace the separators.
Send the models (or impressions) to the lab. The lab will fit bands on the models. You can use VPS impression material if you want the lab to pour the model. Don't try to take an impression of the bands on the teeth with VPS. It's difficult enough trying to get those impressions out of the mouth WITHOUT bands.
An alternate method for the Extreme Xbow by Extreme Dental Lab in Toronto which has a license to make Xbows in Canada and the US.
Take alginate impressions or digital impressions with a scanner and send them to Extreme. Place separators on the upper and lower first molars only after the impressions are taken. (Don't ask me how this works but it does).
Extreme will fit bands on the first molars and place occlusal rests on the upper and lower first bicuspids
(and upper second molars if they have erupted) Micro-etching the occlusal rests and bonding them to the teeth is critical with this technique, especially to the upper first bicuspids when bands are not used.

"Extreme Xbow" on printed models from an iTero digital scan by Dr. Bob Miller. Use occlusal headgear tubes on the upper 6’s to attach the Forsus device springs.
Once space is gained from the expansion, use upper RME X 4 or RME X 6 mechanics, if necessary. After alignment, segment the archwire distal to the lateral incisor or canine. This allows over-correction of the Class II buccal segments and opening space for the upper canines without over-retraction of the upper incisors.
If the upper incisors are well aligned and the maxilla doesn't need expanding initially, cement the maxillary expander and the Triple "L" Arch at the same time and place the springs immediately or one week later. If you need to expand the maxilla first, wait to cement the Triple "L" Arch until you are ready to attach the springs.
Microetch the bands and occlusal rests just before cementation. We use the Unitek™ Multi-Cure Glass Ionomer Band Cement from 3M Unitek. This powder-liquid cement has a long working time and on demand light cure. We rarely have a loose band.
Bond the occlusal rests with Transbond™ Supreme LV Low Viscosity Light Cure Adhesive. If the upper second molars have erupted bond an occlusal rest to prevent the first molars from intruding too much.
Occlusal rests for the maxillary second molars can be placed even if they are just erupting and still mostly covered with soft tissue. The rest can be placed at the level of the soft tissue so that when the second molar erupts further the rest will contact the occlusal surface. It is not necessary to bond the rest in this case.
If the labial bow is too close to the gingiva of the lower incisors use a three-prong plier posteriorly to raise it. If the buccal section of the labial bow is too close to the teeth and the pushrod is hung up then use a three-prong plier from the occlusal on the spot with the least clearance to bow out the wire.
To open the pushrod loop enough to place it on the labial bow simply push a bird beak far enough into the loop and squeeze the tips together through the opening. To remove the rod from the labial bow take the end with your fingers and flip it anteriorly so that the labial bow passes through the loop opening.
See the patient every six weeks and overcorrect the maxillary first bicuspid to a half cusp Class III. This ensures that the bicuspid and molar root apices end up Class I after tipping has relapsed.
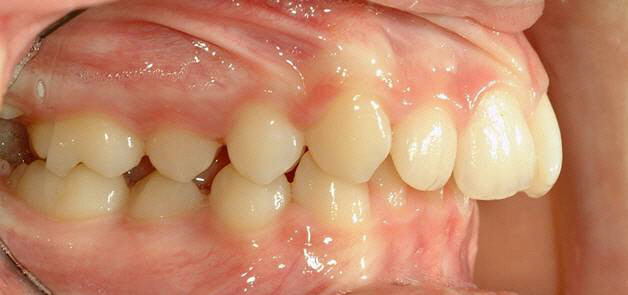
Initial, first bicuspid relationship is a half cusp Class II.
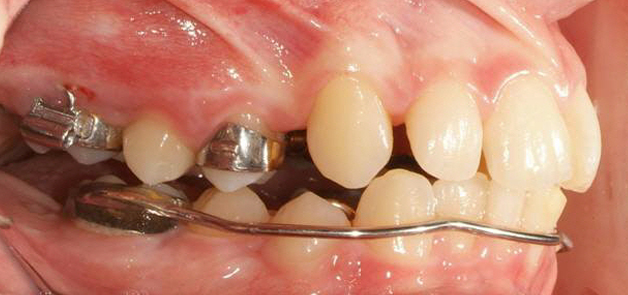
Half cusp overcorrection of first bicuspids after 4 months Xbow.
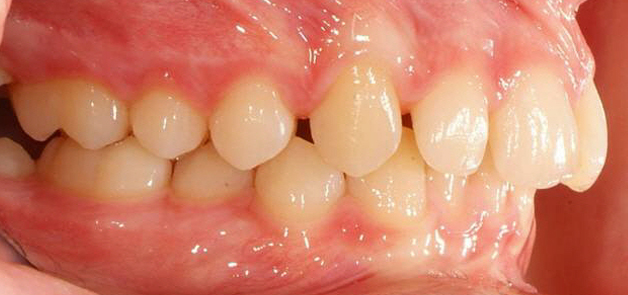
"Bite-catching" by first bicuspids after rebound (7 months post-Forsus).
The use of the Forsus device causes rapid over-correction, usually in four to five months. Fully compress the springs by distalizing the Gurin locks with the Gurin lock wrench.
A fully compressed spring will stay active longer as the patient opens. A fully compressed Forsus device has 200 grams of force and loses 20 grams for every 1 mm of deactivation.
If you run out of length on the labial bow to reactivate the spring then you can either replace the pushrod with a longer one or use a "shorty" hook-up.
A "shorty" hook-up uses an "L" pin inserted from the mesial of the headgear tube with a 22mm pushrod. Once overcorrection has been achieved remove the springs and Gurin locks and start the maxillary expansion, if necessary.
Test the stability of the Class II correction for a couple of months and replace the springs on one or both sides, if necessary. The goal is a socked-in Class I first bicuspid. If the lower e's have not exfoliated cut the labial bow and occlusal rests off with a high speed.
We overcorrect maxillary expansion depending on the amount of constriction. If there is a complete bilateral crossbite we overcorrect the upper molars into a buccal crossbite. If the crossbite is unilateral we overcorrect the non-crossbite side into a buccal crossbite.
If there is a crossbite tendency as a result of Class II correction we overcorrect the molars until the lingual cusp tip of the upper molar contacts the buccal cusp tip of the lower molar on one side. We leave the RME in place to retain the expansion for an additional five months.
This gives us the opportunity to check for Class II relapse two months after completing the expansion and replacing the Forsus device on one or both sides.
“L” Pin & Pushrod Adjustment
Xbow Comfort: Orthodontists are contacting Comfort Solutions after their patients experience sores. I recommend that you start with anterior and posterior spring caps and have Spring Sleeves and Spi-Wrap on hand. Spi-Wrap is spiral cut tubing that works well for sores from the lower labial bow as well as transpalatal arches.
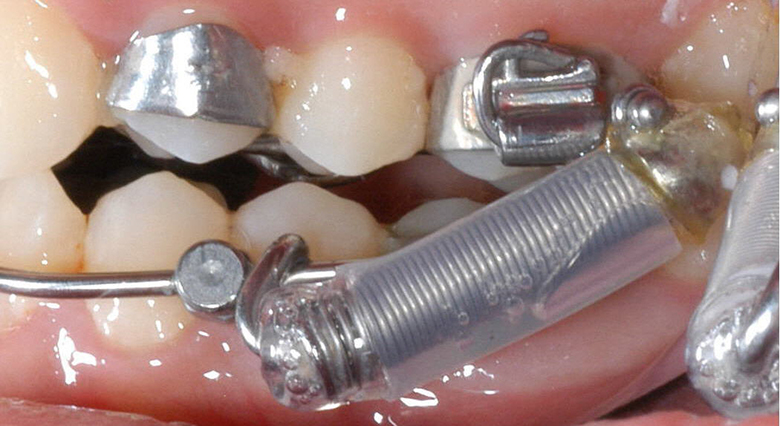
Distal Hookup
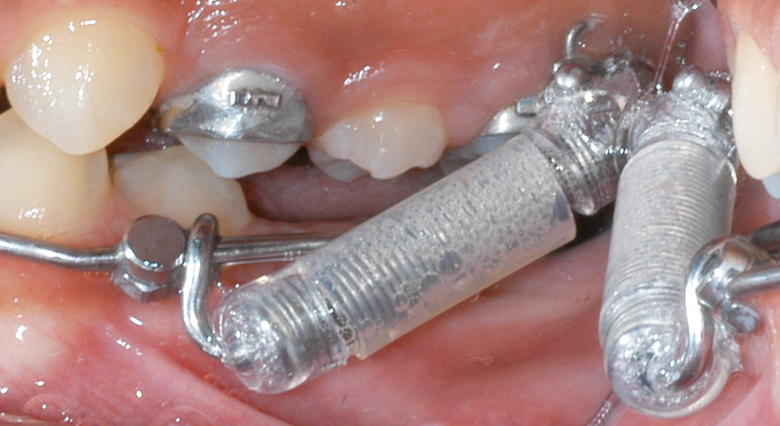
Mesial Hookup
"Spring Sleeve" combined with anterior and posterior caps to form a "Comfort Capsule". Spring Sleeves are used when the spring is irritating or catching the cheek. We are using "L" pins instead of EZ2 modules.
We find it is easier to adjust "L" pins to position the spring ideally. Insert "L" pin with attached spring into headgear tube and let spring and "L" pin fall straight down. Support spring against maxillary teeth with finger and bend "L" pin straight back at 90 degrees to the ball and "axle.”
Rotate spring so that "axle" points slightly gingivally and end of pin is gingival and against bracket.
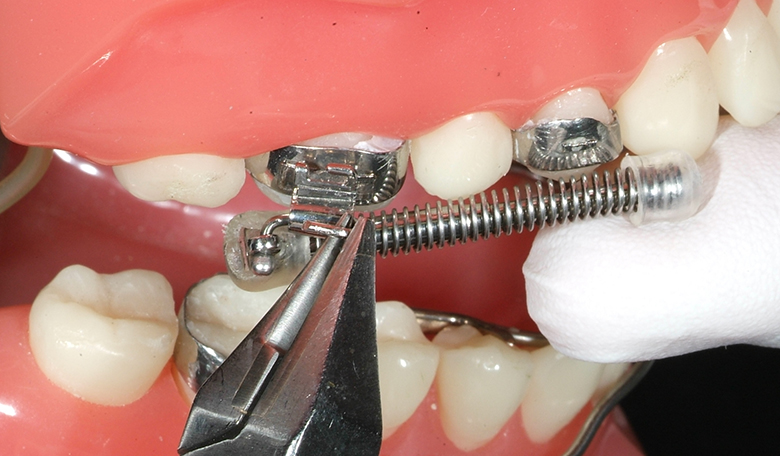
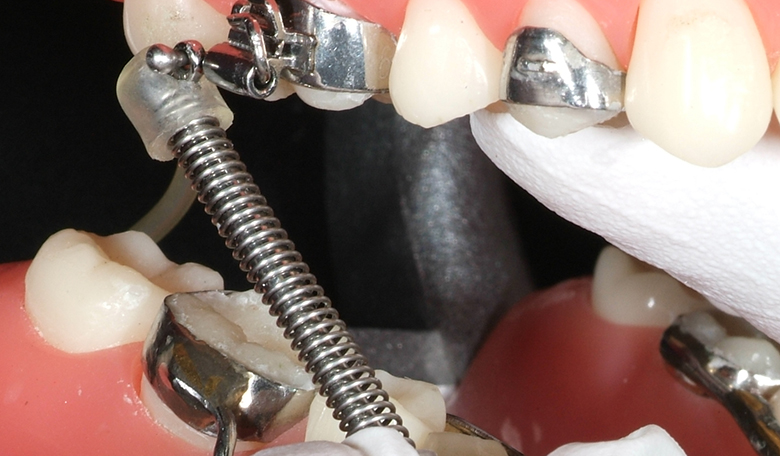
Begin with a straight 22 mm pushrod. We routinely rotate the Gurin Lock 180 degrees after completely tightening it and then rotate it a few degrees clockwise to position the anterior spring (with cap) about 1 or 2 mm off the gingiva. If the spring or anterior cap still impinges on the gingiva, or if the posterior spring hits the lower labial bow or solder, bend the "L" pin gingivally (see below).
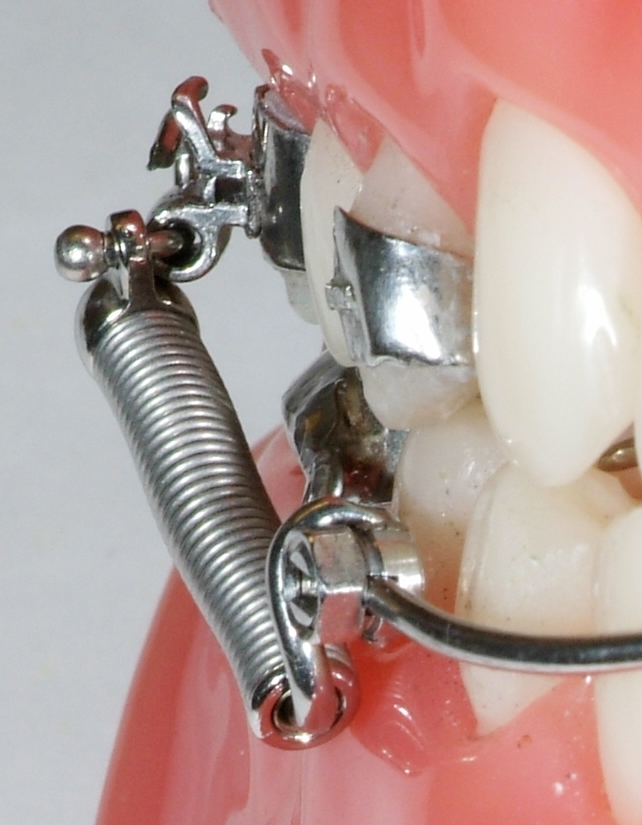
Straight "L" pin, mesial hookup with spring touching gingiva.

Bending pin gingivally with a fine bird beak plier.
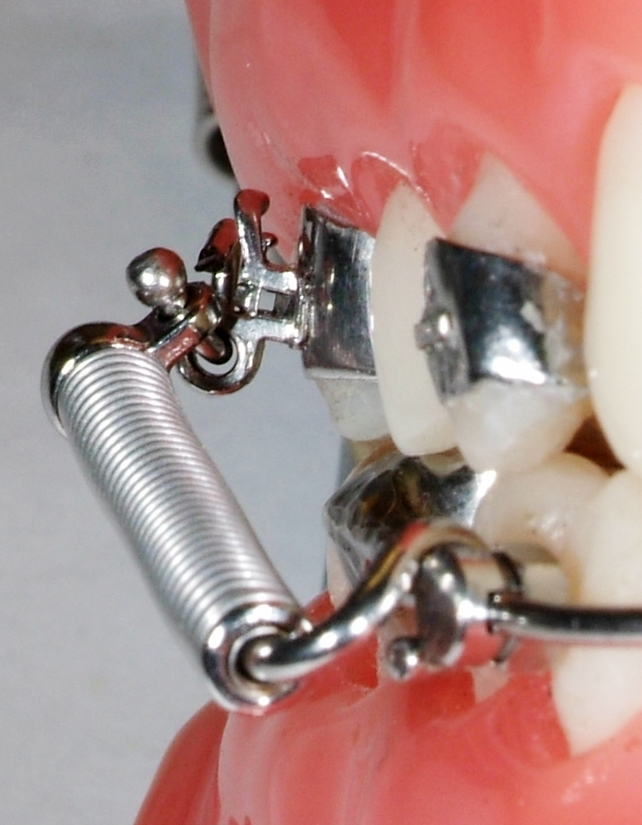
Buccal movement of spring with bent pin and Gurin lock rotated 180 degrees (22 mm pushrod).
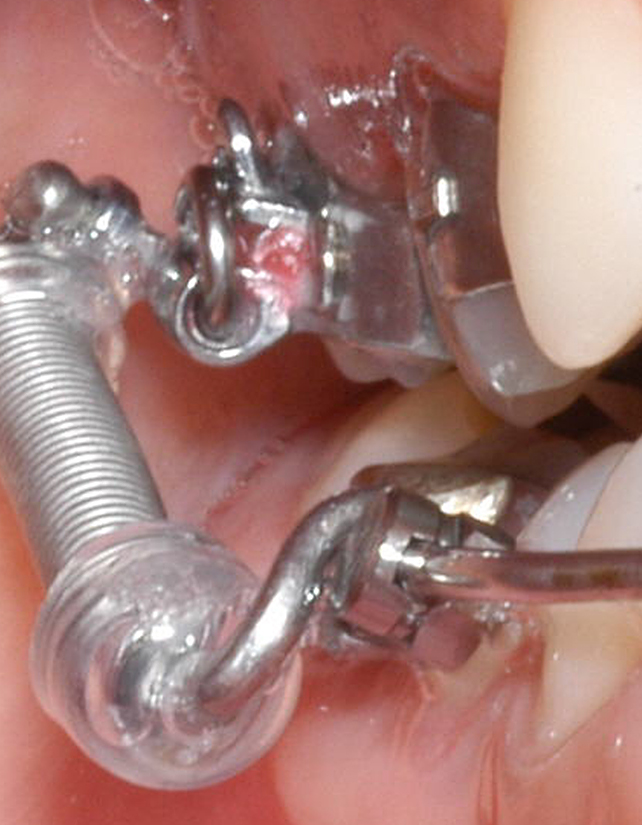
"L" pin bent up and Gurin lock spun 180 plus degrees to move spring buccally.
“L” Pin Adjustment
Adjust the "L" pin so that the spring is parallel to the lower labial bow. This example shows a mesial hookup. This has to be right or the pushrod will not function properly.


If the spring is still too close to the gingiva, bend an offset (bayonet bend) as far anteriorly as possible on a 22 mm pushrod. (See Below)
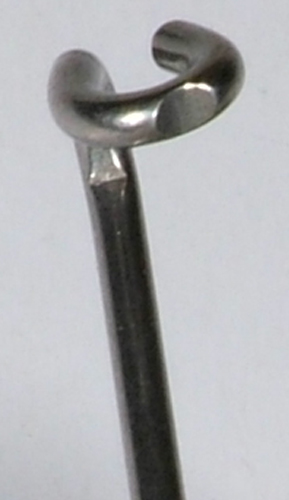
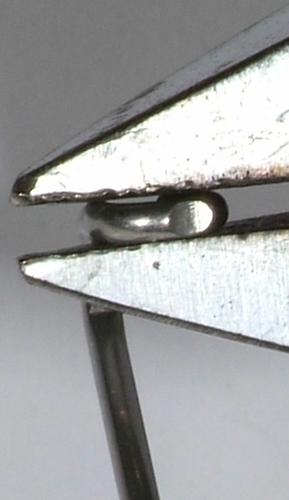
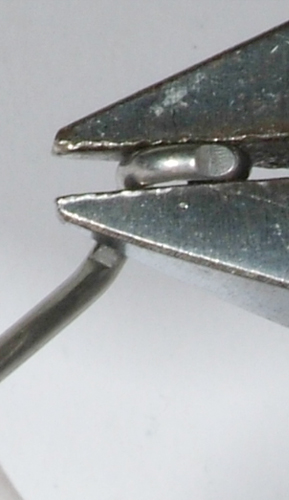
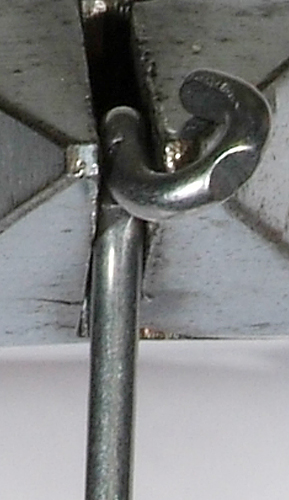
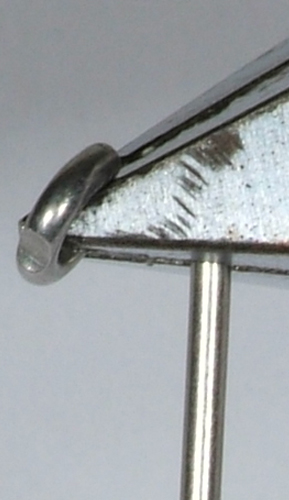
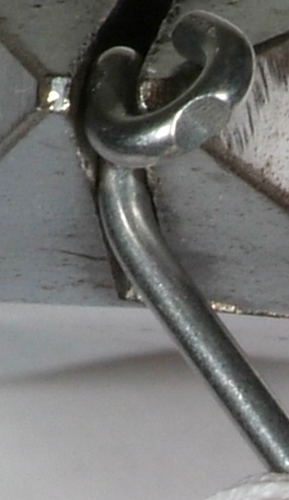
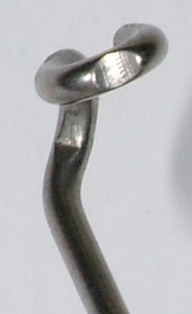
Use a heavy plier such as an Adam's. The first bend is 45 degrees towards the buccal. The second bend is made with the beak of the plier inserted into the loop of the pushrod. This second bend determines how far buccal the spring is. The more obtuse the angle between the rod and loop is, the more buccal the spring will be. In other words, opening the angle between the rod and loop moves the spring buccally.
If the bend is too obtuse the loop will bind on the labial bow and will not slide which reduces the amount of opening before the rod disengages from the spring. 22 mm pushrods with bayonet bend. If the pushrod connects too far posteriorly on the labial bow it may be necessary to use a 25 or 29 mm pushrod OR a mesial hookup (see below).
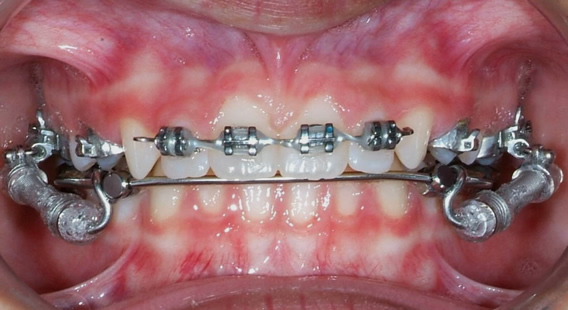
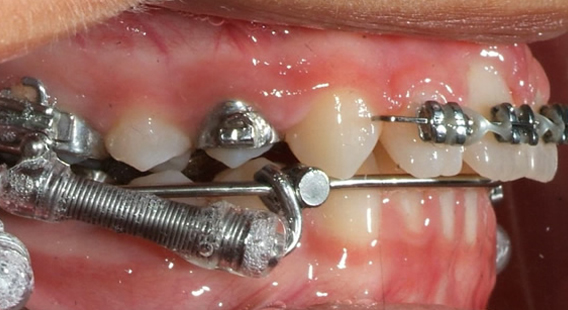
If a 25 or 29 mm pushrod is used a bayonet bend reduces lip impingement by the pushrod. Straight 25 mm rod and a 25 mm rod with bayonet bend. 25 mm rod with bayonet bend. Below is a video clip of Dr. Bob Miller bending a bayonet bend in a 25 mm pushrod.


EZ2 Clip Instructions
There is a greater chance for interference between the thicker clip and the lower molar solder joint This may cause the upper molar bracket weld to fail or the band to tear. In this case, it is better to expand the maxilla before you place the springs or remove the anti-rotation arm (see photo: EZ2 with anti-rotation arm removed, 22 mm pushrod, and Gurin lock rotated 180 degrees).
